First let me explain the title of the project. Where I live, we call a video projector a "beamer" instead of a projector. Which is weird, but who cares. Regarding the "4K" in the name of this project, it is directly related to the total number of pixels it produces. Because 84x48=4032 pixels (rounded to 4000 or 4K). Which was also a very commomn way to calculate the resolution of a device. A method very well used for indication the resolution of cameras, for instance a 12Mpixel camera has a total (X*Y) of 12M pixels. So, when I made this project (somewhere around 2008), it was impossible for me to predict that somewhere in the distant future, the naming convention of using the X*Y, no longer would apply. And monitors, TVs and beamers are called 4K because of the number of pixels ONLY on the horizontal line. Anyway, this project is about a beamer that does what it exactly what it says, it really outputs 4K pixels, 4032 pixels to be precise. Regarding images and definitions, about 100 years ago, television images had a resolution of 32-lines and nobody ever spoke about horizontal resolution, even in the days of modern TV of 405, 480 or 625 lines. Funny how things change.
 The 1541-III project has evolved and a new and better display has come up. Where the prototype had only a 2 line display, now the final version has a display capable of 6 lines. It is not text based but graphical. This LCD is from an old nokia telephone and can be bought new on marktplaats or ebay for a few euros. With some small modifications this display can be used as an frame inside a slide-projector. Since I did not have a slide-projector I decided to build one myself.
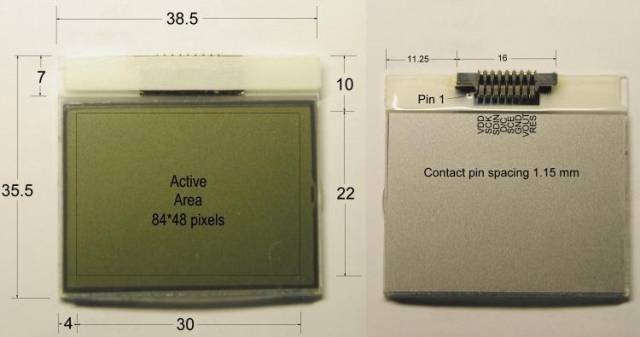
I could use it for my next presentation at the commodore meeting in Maarsen. What it does is simple and I'm very pleased with the result. The beamer projects the image of the 1541-III's display onto a wall/screen so it can be seen by more then one person. Also it draws attention to my project in a simple way... As you can see", it is a very simple build. All it contains is a transformer (230V to 12V), a 50W halogen lamp and a rectifier to generate the DC-voltage for the fan. Which is driven with 9V instead of 12 to reduce the noise, the airflow is still sufficient. Two sheets of thin glass isolate the hot air generated by the 50W a halogen bulb. A creditcard sized fresnel lens (sold as an portable unbreakable magnifying lens years) to flatten out the light from the lamp. And the LCD (84x48 = 4032 pixels) which was obtained from an old Nokia phone (the reflective foil was very gently removed and wires soldered directly to the connector pins of the controller build "into" the LCD. Then last but not least a lens, salvaged from an ordinary large magnifying glass. The total cost was under 20 Euro. If you try to replicate this, build a cardboard versions first, this works quickly and saves a lot of mathematical effort. I can assure you, working with low cost materials like these the trial and error method is much faster then the theoretical approach.
 Above is shown an example of the image it can produce. Here you'll see (on the left) the splash screen of the 1541-III project. As a projection surface I used the bedroom-door. If you look closely you'll notice the door handle. Which gives you a nice reference of the size of the image (and it save me holding up a banana for scale). Now you can clearly see why this project is called 4K-pixel beamer as you can almost count every individual pixel, all 4032 of them.
On the right, you'll see the main screen of the 1541-III. A screen that shows the user status information like: file indexnumber/totalnumber of files on card, name of currently selected .D64 file. After reset no file is selected therefore all actions refer to the root directory, two empty lines that do not really have a final definition (currently it states the processed command), a progress bar (show loading status), device-id (8 or 9), current track, current sector.
The project
The 1541-III project has evolved and a new and better display has come up. Where the prototype had only a 2 line display, now the final version has a display capable of 6 lines. It is not text based but graphical. This LCD is from an old nokia telephone and can be bought new on marktplaats or ebay for a few euros. With some small modifications this display can be used as an frame inside a slide-projector. Since I did not have a slide-projector I decided to build one myself.
I could use it for my next presentation at the commodore meeting in Maarsen. What it does is simple and I'm very pleased with the result. The beamer projects the image of the 1541-III's display onto a wall/screen so it can be seen by more then one person. Also it draws attention to my project in a simple way...
As you can see", it is a very simple build. All it contains is a transformer (230V to 12V), a 50W halogen lamp and a rectifier to generate the DC-voltage for the fan. Which is driven with 9V instead of 12 to reduce the noise, the airflow is still sufficient. Two sheets of thin glass isolate the hot air generated by the 50W a halogen bulb. A creditcard sized fresnel lens (sold as an portable unbreakable magnifying lens years) to flatten out the light from the lamp. And the LCD (84x48 = 4032 pixels) which was obtained from an old Nokia phone (the reflective foil was very gently removed and wires soldered directly to the connector pins of the controller build "into" the LCD. Then last but not least a lens, salvaged from an ordinary large magnifying glass. The total cost was under 20 Euro. If you try to replicate this, build a cardboard versions first, this works quickly and saves a lot of mathematical effort. I can assure you, working with low cost materials like these the trial and error method is much faster then the theoretical approach.
Above is shown an example of the image it can produce. Here you'll see (on the left) the splash screen of the 1541-III project. As a projection surface I used the bedroom-door. If you look closely you'll notice the door handle. Which gives you a nice reference of the size of the image (and it save me holding up a banana for scale). Now you can clearly see why this project is called 4K-pixel beamer as you can almost count every individual pixel, all 4032 of them.
On the right, you'll see the main screen of the 1541-III. A screen that shows the user status information like: file indexnumber/totalnumber of files on card, name of currently selected .D64 file. After reset no file is selected therefore all actions refer to the root directory, two empty lines that do not really have a final definition (currently it states the processed command), a progress bar (show loading status), device-id (8 or 9), current track, current sector.