In order to demonstrate the Lighthammer project, I wrote a game. Originally I intended to show it, at the Commodore meeting, using just with a normal monitor on a normal table. However, this doesn't stick out on meeting when you are surrounded by computers and monitors that look similar, with the only exception is my little hammer. Fortunately I couldn't make it that particular meeting so the demonstration had to be postponed for two months. Well considering that I want to make an impact with my project. It came to my mind to make a cabinet and I had two months to do it. That are approx. seven full weekends, it should be possible.
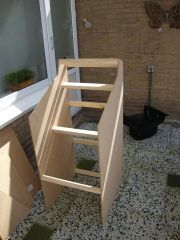
 So a few days after that bright moment of inspiration I hopped onto my bike a went to the local second hand store. For €10,- I bought a 4:3 50 cm CRT television. Then I hopped on my bike again and went to the hardware store to buy some MDF and wood. When I came home I immediately went to work. I stripped the TV from all the unwanted parts. I cleaned the parts that were important. Then I started to shape the wood and made the first rough shapes of the cabinet. Although I was aware of the fact that I did not discuss this with the wife and I haven't thought about the place were I was going to store in until the day of the meeting I joyfully carried on working when suddenly... the wife came along. "What are you doing" she asked. Well I had to confess I was making an arcade cabinet to demonstrate the lighthammer project. I immediately said that it didn't cost much. "Where are you going to put it" she said, well I said that I made it only for the meeting and then afterwards was going to disassemble it.
And then, to my surprise she said "If you make it look nice you may put it in the living room, then you don't have to disassemble it, that would be a waste of all your work". It could be where the cat has her food dishes, that would be a nice place... BUT these dishes must stay there, think about it. I was surprised with this reply but knowing that the cabinet could stay for many years to come, things changed a little.
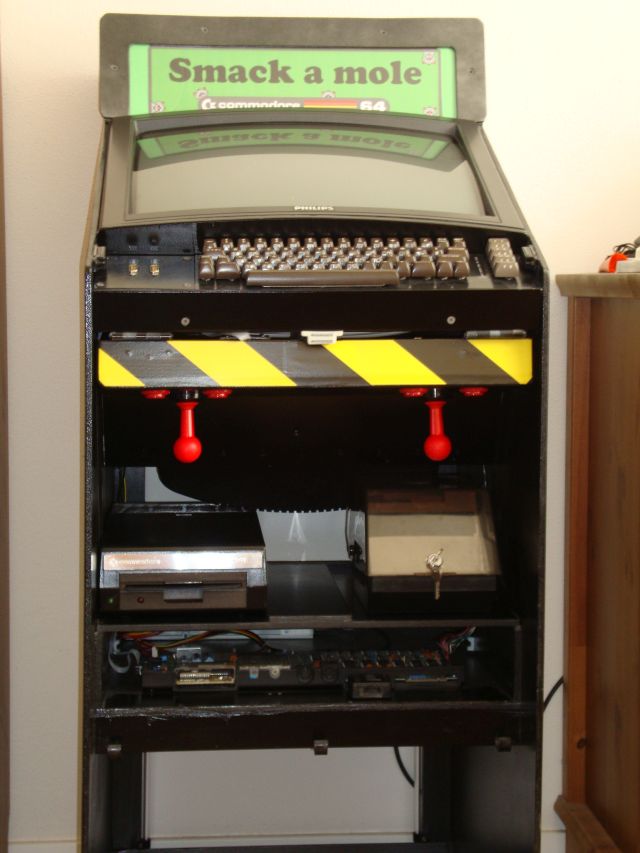
I experimented, tried and measured for many many hours and I forgot some important things (like the volume buttons and the reset button). The volume buttons eventually went on top of the cabinet though I could have used a remote control but the TV came without remote control. That was no problem because I wanted buttons because you can't loose them, the remote would eventually have bad batteries, fall on the ground and most importantly requires a hole in the cabinet for the IR-sensor of the TV to look at the remote. The buttons are on top of the cabinet, out of sight if you are small but in reach. The reset button was combined with the restore key on the keyboard.... blablabla...
Because the cabinet will be placed in the living room and it had to pass the WAF (wife acceptance factor) criteria. I had to do some some research on what to put on it. Stickers perhaps, nehhh... to expensive and I probably mess them up anyway when I apply them to the cabinet. Airbrush has always got my attention... but I'm no artist and I have no airbrush equipment. So I put this to rest for a few weeks. And indeed after a few weeks it came to mind that there are spray paint artists that make amazing stuff with very simple tools and tricks. Planets, moons, stars and mists. Well it was clear to me from then. The theme of the cabinet is going to be a space like theme. It made som much sense to me, space was an important thing when you were a kid in the 80's, LEGO had the great space series, and there were lot's of space based series on television (buck rogers, battle star gallactica, astronautjes), and let's not forget that lots of games were about space adventures. So a space theme would be great (if properly done). So I googled and found some videos, I viewed many, try to memorize their tricks and went to try them out on a piece of canvas I bought with the spray paint at the local discounter. Spray paint doesn't need to be expensive. It took me many tries before I got the hang of it and after a while I was confident enough to spray paint the cabinet with me new skills. Well, it looked nice on one side, then the other side, which looked even better. Then I attempted to do the front but this didn't work out the way I wanted it, so I took the solver spray paint and sprayed a mist like layer over the Commodore logo, now the little errors round the edges of the logo were less noticeable. And as a small side effect I noticed that it fitted the plastic of the CRT.
Well in the end it all turned out nice: the wife was happy, the cat was happy (which is happy as long as she gets her meals) and I'm happy. And to my surprise the kids liked the cabinet and the old games too...

 For those who wonder how all games/files are loaded into the C64, I use (what a surprise) my own storage project "the Cassiopei". This little device is small but powerful and very easily placed into the cabinet (as it fits directly into the cassetteport). Using the cassetteport doesn't mean that this device is slow. It is anything but slow, as it loads more then 50 times faster then standard tape. It is even faster then some 1541 serial diskdrive speedloaders. Also it can easily be removed to load new game/files onto it and in combination with the menu program the user does not need to type LOAD blablabla, he/she simply presses: shift+ runstop followed by pressing menu button on the device. And from there it all goes automatically and within a few moments the menu is visible or the game is loaded and you can play. If you want to know more about this device then visit my Cassiopei project page
The cabinet also has room for a diskdrive (even two if it needs to), because I want to be able to use real disks. Now, not that I need to play games from disks, but simply because there is enough room to place one and it might be usefull in case somebody gives me an old disk at a Commodore meeting. Also otherwise the diskdrive would be in storage (a box at the attic) simply because I do not use them enough to justify permanent placement on my desk. The images below also demonstrate that the door of the cabinet can be removed. This is quite easy because the bottom side of the door is a piece of PVC pipe that lies on three hooks, so the hinge is completely open and relies on gravity to prevent it from floating up. I wanted the door to be removable for maintenance and practical use with the diskdrive. It also allows for direct access to all the ports of the C64 (the disdrive connection is soldered directly to the motherboard of the C64 to keep the IEC connector free, this looks a little nicer because you (almost) see no cables when you open the cabinet.
The diskdrive is an ordinary brown 1541 diskdrive. The drives was not pretty to look at and had minor technical problems, which mostly were solved by careful cleaning. Because these drives tend to get quite hot I changed the way the disk drive gets its power. I simply used the cabinets power supply of 5V and 12V (which is a recycled PC power supply, which can supply many diskdrives and C64's at the same time. And because the disk drive no longer requires to use it's own power regulators the drives overall power efficiency is now a lot better and doesn't get hot any more. In order to the disk drive fit the colors of the cabinet I painted it black. And while doing so I noticed some small amount of paint on the logo of the drive. So I used acetone I removed it, that was a stupid idea, because the acetone also removed all the paint of the logo to. It came of instantly and almost without effort! I was unpleasantly surprised, but then I decided to just remove all the paint from the metal logo strip. And what remained was a shiny/silvery metal strip... which looked great. It looked so much better with the black then the original colored stripes on a brownish background, wow. hat started as a stupid mistake, turned out to be a great move. Now it even looks like a completely different drive.
Next to the disk drive is room for another disk drive, but there is really no need for that. So that space is now occupied by a small disk storage box filled with games and empty disks. Because you never know when you need a disk. Although, I don't intend to use the disk drive many times, but I can when I have to. So In the end, I now have a fully functional C64 in my living room, looking like an arcade cabinet.
How it all started
So a few days after that bright moment of inspiration I hopped onto my bike a went to the local second hand store. For €10,- I bought a 4:3 50 cm CRT television. Then I hopped on my bike again and went to the hardware store to buy some MDF and wood. When I came home I immediately went to work. I stripped the TV from all the unwanted parts. I cleaned the parts that were important. Then I started to shape the wood and made the first rough shapes of the cabinet. Although I was aware of the fact that I did not discuss this with the wife and I haven't thought about the place were I was going to store in until the day of the meeting I joyfully carried on working when suddenly... the wife came along. "What are you doing" she asked. Well I had to confess I was making an arcade cabinet to demonstrate the lighthammer project. I immediately said that it didn't cost much. "Where are you going to put it" she said, well I said that I made it only for the meeting and then afterwards was going to disassemble it.
And then, to my surprise she said "If you make it look nice you may put it in the living room, then you don't have to disassemble it, that would be a waste of all your work". It could be where the cat has her food dishes, that would be a nice place... BUT these dishes must stay there, think about it. I was surprised with this reply but knowing that the cabinet could stay for many years to come, things changed a little.
The arcade cabinet
So I decided to add some extra features (yes the project was getting out of hand from that moment). However the features may not interfere with the deadline. I wanted joysticks, ohh and a keyboard, but that must be hidden during the demonstration, it must be user friendly, so the kids can use it when they like and don't need to ask me to set it up. But also it must be sturdy enough so can take some small abuse. And in the mean while it must be according the "silly" WAF-rules. Did I mention safety... so lots of little holes for the heat to escape, high voltage of CRT must be unreachable under any condition and all the components need to be serviceable and not forget, what if I want to add a paddle or lightgun or special kind of joystick in case I don't like the build-in ones. My mind was put into high gear the days after the news that the cabinet could stay forever. How can I pull this off without exceeding the 2 month time limit and most importantly, keeping expenses to a minimum.I experimented, tried and measured for many many hours and I forgot some important things (like the volume buttons and the reset button). The volume buttons eventually went on top of the cabinet though I could have used a remote control but the TV came without remote control. That was no problem because I wanted buttons because you can't loose them, the remote would eventually have bad batteries, fall on the ground and most importantly requires a hole in the cabinet for the IR-sensor of the TV to look at the remote. The buttons are on top of the cabinet, out of sight if you are small but in reach. The reset button was combined with the restore key on the keyboard.... blablabla...
Because the cabinet will be placed in the living room and it had to pass the WAF (wife acceptance factor) criteria. I had to do some some research on what to put on it. Stickers perhaps, nehhh... to expensive and I probably mess them up anyway when I apply them to the cabinet. Airbrush has always got my attention... but I'm no artist and I have no airbrush equipment. So I put this to rest for a few weeks. And indeed after a few weeks it came to mind that there are spray paint artists that make amazing stuff with very simple tools and tricks. Planets, moons, stars and mists. Well it was clear to me from then. The theme of the cabinet is going to be a space like theme. It made som much sense to me, space was an important thing when you were a kid in the 80's, LEGO had the great space series, and there were lot's of space based series on television (buck rogers, battle star gallactica, astronautjes), and let's not forget that lots of games were about space adventures. So a space theme would be great (if properly done). So I googled and found some videos, I viewed many, try to memorize their tricks and went to try them out on a piece of canvas I bought with the spray paint at the local discounter. Spray paint doesn't need to be expensive. It took me many tries before I got the hang of it and after a while I was confident enough to spray paint the cabinet with me new skills. Well, it looked nice on one side, then the other side, which looked even better. Then I attempted to do the front but this didn't work out the way I wanted it, so I took the solver spray paint and sprayed a mist like layer over the Commodore logo, now the little errors round the edges of the logo were less noticeable. And as a small side effect I noticed that it fitted the plastic of the CRT.
Well in the end it all turned out nice: the wife was happy, the cat was happy (which is happy as long as she gets her meals) and I'm happy. And to my surprise the kids liked the cabinet and the old games too...
Inside the cabinet
For those who wonder how all games/files are loaded into the C64, I use (what a surprise) my own storage project "the Cassiopei". This little device is small but powerful and very easily placed into the cabinet (as it fits directly into the cassetteport). Using the cassetteport doesn't mean that this device is slow. It is anything but slow, as it loads more then 50 times faster then standard tape. It is even faster then some 1541 serial diskdrive speedloaders. Also it can easily be removed to load new game/files onto it and in combination with the menu program the user does not need to type LOAD blablabla, he/she simply presses: shift+ runstop followed by pressing menu button on the device. And from there it all goes automatically and within a few moments the menu is visible or the game is loaded and you can play. If you want to know more about this device then visit my Cassiopei project page
The cabinet also has room for a diskdrive (even two if it needs to), because I want to be able to use real disks. Now, not that I need to play games from disks, but simply because there is enough room to place one and it might be usefull in case somebody gives me an old disk at a Commodore meeting. Also otherwise the diskdrive would be in storage (a box at the attic) simply because I do not use them enough to justify permanent placement on my desk. The images below also demonstrate that the door of the cabinet can be removed. This is quite easy because the bottom side of the door is a piece of PVC pipe that lies on three hooks, so the hinge is completely open and relies on gravity to prevent it from floating up. I wanted the door to be removable for maintenance and practical use with the diskdrive. It also allows for direct access to all the ports of the C64 (the disdrive connection is soldered directly to the motherboard of the C64 to keep the IEC connector free, this looks a little nicer because you (almost) see no cables when you open the cabinet.
The diskdrive is an ordinary brown 1541 diskdrive. The drives was not pretty to look at and had minor technical problems, which mostly were solved by careful cleaning. Because these drives tend to get quite hot I changed the way the disk drive gets its power. I simply used the cabinets power supply of 5V and 12V (which is a recycled PC power supply, which can supply many diskdrives and C64's at the same time. And because the disk drive no longer requires to use it's own power regulators the drives overall power efficiency is now a lot better and doesn't get hot any more. In order to the disk drive fit the colors of the cabinet I painted it black. And while doing so I noticed some small amount of paint on the logo of the drive. So I used acetone I removed it, that was a stupid idea, because the acetone also removed all the paint of the logo to. It came of instantly and almost without effort! I was unpleasantly surprised, but then I decided to just remove all the paint from the metal logo strip. And what remained was a shiny/silvery metal strip... which looked great. It looked so much better with the black then the original colored stripes on a brownish background, wow. hat started as a stupid mistake, turned out to be a great move. Now it even looks like a completely different drive.
Next to the disk drive is room for another disk drive, but there is really no need for that. So that space is now occupied by a small disk storage box filled with games and empty disks. Because you never know when you need a disk. Although, I don't intend to use the disk drive many times, but I can when I have to. So In the end, I now have a fully functional C64 in my living room, looking like an arcade cabinet.