I've experimented with foam cutting using the hot wire method. But instead of a wire I placed a modified tip (one that was ready for the bin anyway) in my soldering iron. This worked out fine.
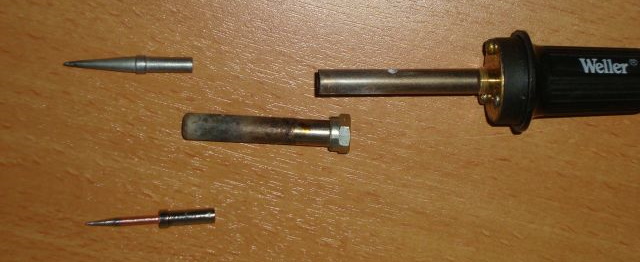 My trusty old soldering iron. This has a method of controlling the temperature very accurately and it only requires me to make a special tip. Fortunately, I have such a tip, which requires only a slight modification in order to use it. I modified the oldest and worst soldering tip I had (no problem since it was time to be replaced anyway) and by doing so giving it a new purpose for many years to come. The purpose of being used for cutting foam. Modifying the tip was very easy, using my drill press and a file to file it down to the desired diameter. You could say that I used my drill press as a lathe, which is slightly true. Since this is mainly possible because soldering tips are made of very soft material (copper), my file was a very sharp one.
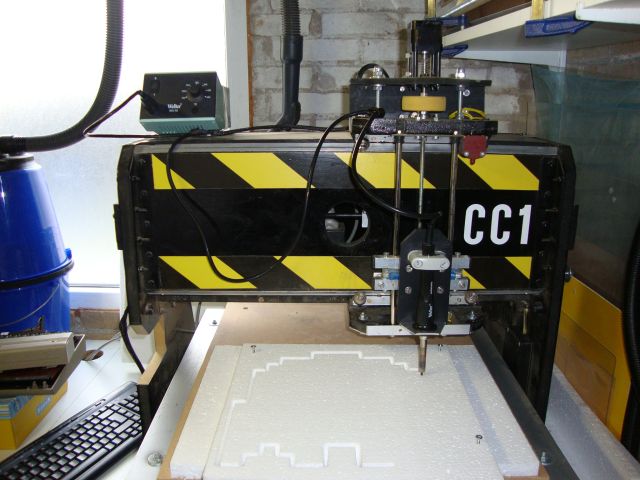 First test used lot's of tie-raps to fasten the soldering iron to the machine. I wasn't sure if the soldering iron was to heavy for this task, I experimented with the temperature and settled for a point where the foam was molten only slightly. I certainly don't want to burn it. So a temperature of 225 degrees Celsius on my modified tip causes a stable hole in the foam of 6 mm. Almost twice the size of the tip, which is great because the foam melts before it even touches the tip, although this is only true when the speed of the machine is set to move slow enough. However since my machine is very slow by default (it just can't go that fast), this is no problem at all. The label on the machine says "CC1" which stands for Cheese Cutter 1, the design of the machine was intended mainly for very simple tasks like engraving and cutting special holes and patterns or nameplates. It goes without saying that it can cut more dense materials then cheese, but it require patience. Anyway, it still is a simple and low cost MDF, aluminum angle and ball bearing based machine. The Z-axis coupling is a rubber hose on the photo, but has been replaced by a decent aluminum coupler. Which you can buy from an internet shop for just a few euro's. This was a huge design improvement because the hose coupler simply wasn't up to the task of moving a router up/down for long periods of time. This because the stepper motor becomes very warm (acceptably hot), resulting in the hose becoming much softer. Making it less rigid and much harder to properly clamp it to the smooth shaft of the stepper motor.
With the principle proven to work, it was time to make a simple holder for my soldering iron. Very important, because I need my soldering iron for soldering also, meaning that it must be easy to place/remove from the machine. So now you see, with just a few simple actions, my CNC machine is converted (you could say downgraded) into a foam cutting machine. Fortunately I can easily swap out the soldering iron for the router and cut the designs into wood or other materials if I need to.
I then cut my first "serious" object. Drawn in QCAD, prepared using CAMBAM and machined using MACH3, a little Pacman figure, followed by a set of ghosts. When all the figures were cut, it was time to paint them and when the paint was dry (enough) I put the figures onto the fence. In case you want to do this also I have a small tip: do not use spray paint. The solvents in the spray paint may attack the foam (which simply melts) destroying your creation. There are some tricks or special paints which bypass this problem, but in case you do use spray paint, always test it on a piece of foam that you are going to trow away anyway. I used paint they also use in elementary school, I reckoned that if it was to be safe for children it would be safe for foam too. There is only one catch... make sure it doesn't stay wet for too long or the paint will dissolve in water. As you can see on the photo below, this isn't a big problem, even when wet, the paint stays in place, it doesn't run, just don't touch it after a rainy day.
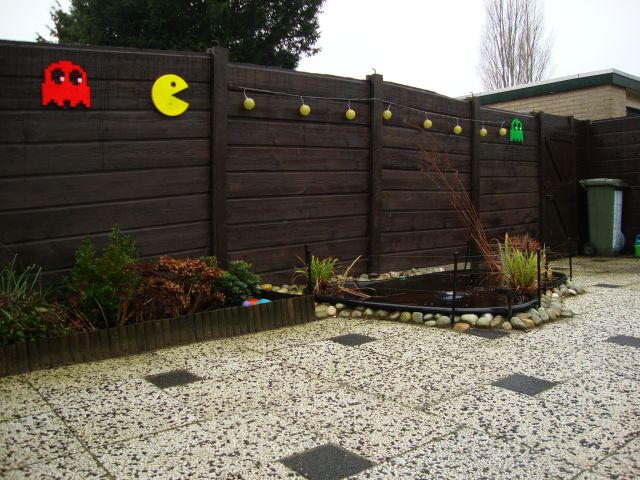 The IKEA lights now have reached their full potential. I like it, the simple old fence is now a lot less boring.
Update 2021: the Pacman and ghost figures have survived for several years without any issue. The weather didn't affect it at all, although the paint was wearing thin in some places. The biggest issue were the IKEA lights, after a few years they started to fail, damage and fall down. You could say that Pacman ate the lights, but it was starting too look sad. Anyway, the foam held up very nicely.
How it all started:
In the X-mas holidays of 2014 I spend some time discovering the possibilities with foam cutting. So I could make a simple sign without having to waste lot's of time. This because my machine isn't the fastest CNC machine around, technically speaking it is dead slow. So cutting wood no matter the type takes a lot of time. But, cutting foam should be doable a lot quicker since it should not require more then one pass to make a cut. I noticed that EPS insulation foam (Expanded PolyStyrene) can be bought very cheaply at the local hardware store. This opened up a whole new world. The fun is that you can make a large sign very cheap, quickly and light. A good and fun example is also the project you see at the end of this page. Cutting foam isn't done with the router I use to cut wood, nope, I really don't like routers as they make a mess and lot's of noise. And since I don't have a decent method of covering/enclosing the machine (and keeping the vacuum cleaner running for a long period of time isn't as ideal as I once imagined), the entire workplace is covered in dust within minutes after starting the machine. Fortunately foam cutting can be done much easier. Hot wire cutting is a great example of doing this. But the problem with a hot wire is that is must go through your objects. So instead of a wire, I go for a pin. Something that can easily replace my router. And after lot's of thinking how I could make this, it suddenly struck my mind that I'm using such a device already almost every day.
My trusty old soldering iron. This has a method of controlling the temperature very accurately and it only requires me to make a special tip. Fortunately, I have such a tip, which requires only a slight modification in order to use it. I modified the oldest and worst soldering tip I had (no problem since it was time to be replaced anyway) and by doing so giving it a new purpose for many years to come. The purpose of being used for cutting foam. Modifying the tip was very easy, using my drill press and a file to file it down to the desired diameter. You could say that I used my drill press as a lathe, which is slightly true. Since this is mainly possible because soldering tips are made of very soft material (copper), my file was a very sharp one.
First test used lot's of tie-raps to fasten the soldering iron to the machine. I wasn't sure if the soldering iron was to heavy for this task, I experimented with the temperature and settled for a point where the foam was molten only slightly. I certainly don't want to burn it. So a temperature of 225 degrees Celsius on my modified tip causes a stable hole in the foam of 6 mm. Almost twice the size of the tip, which is great because the foam melts before it even touches the tip, although this is only true when the speed of the machine is set to move slow enough. However since my machine is very slow by default (it just can't go that fast), this is no problem at all. The label on the machine says "CC1" which stands for Cheese Cutter 1, the design of the machine was intended mainly for very simple tasks like engraving and cutting special holes and patterns or nameplates. It goes without saying that it can cut more dense materials then cheese, but it require patience. Anyway, it still is a simple and low cost MDF, aluminum angle and ball bearing based machine. The Z-axis coupling is a rubber hose on the photo, but has been replaced by a decent aluminum coupler. Which you can buy from an internet shop for just a few euro's. This was a huge design improvement because the hose coupler simply wasn't up to the task of moving a router up/down for long periods of time. This because the stepper motor becomes very warm (acceptably hot), resulting in the hose becoming much softer. Making it less rigid and much harder to properly clamp it to the smooth shaft of the stepper motor.
With the principle proven to work, it was time to make a simple holder for my soldering iron. Very important, because I need my soldering iron for soldering also, meaning that it must be easy to place/remove from the machine. So now you see, with just a few simple actions, my CNC machine is converted (you could say downgraded) into a foam cutting machine. Fortunately I can easily swap out the soldering iron for the router and cut the designs into wood or other materials if I need to.
I then cut my first "serious" object. Drawn in QCAD, prepared using CAMBAM and machined using MACH3, a little Pacman figure, followed by a set of ghosts. When all the figures were cut, it was time to paint them and when the paint was dry (enough) I put the figures onto the fence. In case you want to do this also I have a small tip: do not use spray paint. The solvents in the spray paint may attack the foam (which simply melts) destroying your creation. There are some tricks or special paints which bypass this problem, but in case you do use spray paint, always test it on a piece of foam that you are going to trow away anyway. I used paint they also use in elementary school, I reckoned that if it was to be safe for children it would be safe for foam too. There is only one catch... make sure it doesn't stay wet for too long or the paint will dissolve in water. As you can see on the photo below, this isn't a big problem, even when wet, the paint stays in place, it doesn't run, just don't touch it after a rainy day.
The IKEA lights now have reached their full potential. I like it, the simple old fence is now a lot less boring.
Update 2021: the Pacman and ghost figures have survived for several years without any issue. The weather didn't affect it at all, although the paint was wearing thin in some places. The biggest issue were the IKEA lights, after a few years they started to fail, damage and fall down. You could say that Pacman ate the lights, but it was starting too look sad. Anyway, the foam held up very nicely.